|

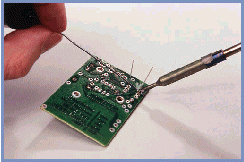
1. Switch on the soldering iron and feed solder to the tip of the
iron as it heats up.
2. Wipe off excess solder onto a damp
sponge.
3. Place the hot iron on the component lead and the PCB pad. Feed
the solder into the far side of the component lead. Solder will
begin to flow around the lead. Do not use too much solder.
4. Next, remove the solder source followed by the iron.
5. Do not disturb the component for a few seconds until the solder
has solidified.
6. Trim the component leads to within 1mm of the soldered joint.
 |
|
|

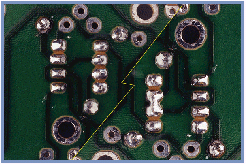
1. Are all of the components in place?
2. Are all of the soldered joints neat and tidy?
3. Is there too much or too little solder on the joint?
4. Has the solder flowed evenly around the lead?
5. Is the solder joint nice and shiny?
6. Are all components inserted the right way around? (Check
polarity!)
7. Check for solder bridges. In common with all tools, a soldering
iron will last longer with correct care and maintenance.
1. Always wipe the bit on a damp sponge prior to making a soldered
joint. Most bench stands incorporate a sponge for this purpose.
2. Always apply solder to the bit of an iron as it heats up. This
will ensure good tinning and long life of the bit.
3. A solder bit that will not wet can be cleaned by lightly
rubbing the bit with a nylon pad. Ensure the iron is switched off
and do not use wire wool or emery paper as this will remove
protective plating and shorten the bit life. . |
|
|

1. Plan the component layout.
2. Mount the smallest components first.
3. Try to leave component identification markings visible.
4. Support heat-producing components above the PCB with ceramic
beads.
5. Keep soldering time to a minimum to reduce the risk of heat
damage to the component.
6. Beware of solder bridging across tracks. This could cause a
short circuit.
7. If working with static sensitive components, always use a wrist
strap connected to an earthing point.

|
|
|
4. Always keep
a hot iron in a bench stand.
5. Never put a soldering iron into liquid.
6. Regularly check the cable for burns. Alternatively use an iron
that is supplied with silicone cable which is resistant to burns
from the soldering iron.
ADDITIONAL INFORMATION
Desoldering
It is sometimes necessary to remove a component from a PCB. To
desolder a component melt the solder around the component with a
soldering iron. When the solder flows remove the molten solder
with a desolder pump. Replace the iron in a stand and allow the
component to cool for a few seconds. Carefully remove the
component from the holes in the PCB.
Soldering guide supplied by
Antex Electronics |
|
![]()